GameObject: "The GameObject is the most important concept in the Unity Editor.
Every object in your game is a GameObject, from characters and collectible items to lights, cameras
and special effects. However, a GameObject can’t do anything on its own; you need to give it properties before it can become a character, an environment, or a special effect."
and special effects. However, a GameObject can’t do anything on its own; you need to give it properties before it can become a character, an environment, or a special effect."
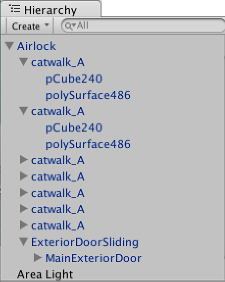
* The Hierarchy window shows all of the Game Objects in your Scene, arranged vertically in a list.
Component: "To give a GameObject the properties it needs to become a light, or a tree, or a camera, you need to add Components to it. Depending on what kind of object you want to create, you add different combinations of Components to a GameObject.
You can think of a GameObject as an empty cooking pot, and Components as different ingredients that make up the recipe of your game. Unity has lots of different built-in Component types, and you can also make your own Components using the Unity Scripting API.
Remember that you can always use the Inspector to see which Components are attached to the selected GameObject. As Components are added and removed, the Inspector will always show you which ones are currently attached. You will use the Inspector to change all the properties of any Component (including scripts)."
Transform Component: "A GameObject always has a Transform Component attached (to represent position, rotation, and scale in the game world) and it is not possible to remove this. The other Components that give the object its functionality can be added from the Editor’s Component menu or from a script.
Transforms are manipulated in 3D space in the X, Y, and Z axes or in 2D space in just X and Y. In Unity, these axes are represented by the colors red, green, and blue respectively."


Creating a GameObject: "There are many useful pre-constructed objects (primitive shapes, Cameras, etc) available on the GameObject > 3D Object menu."
To create a new GameObject, select an object from the above-mentioned menu, or right click inside the Hierarchy and select an object from the pop-up menu. The newly created object will show up already selected in the Hierarchy. Alternatively, if you have imported a 3D model Asset, you can simply drag the Asset from the Project window onto the Hierarchy, and a GameObject will be created, consisting of the 3D model Asset.
"A new, empty GameObject contains a name (“GameObject”), a Tag (“Untagged”), and a Layer (“Default”). It also contains a Transform Component."
The tag and layer aren't relevant for now. You can change the name by clicking on it in the Hierarchy or Inspector (if the game object is selected in the Hierarchy) and typing in your custom name. The Transform Component establishes the object's position and orientation in the game world, viewable in the Scene window.
Mesh: "A 3D mesh is the structural build of a 3D model consisting of polygons. 3D meshes use reference points in X, Y and Z axes to define shapes with height, width and depth."
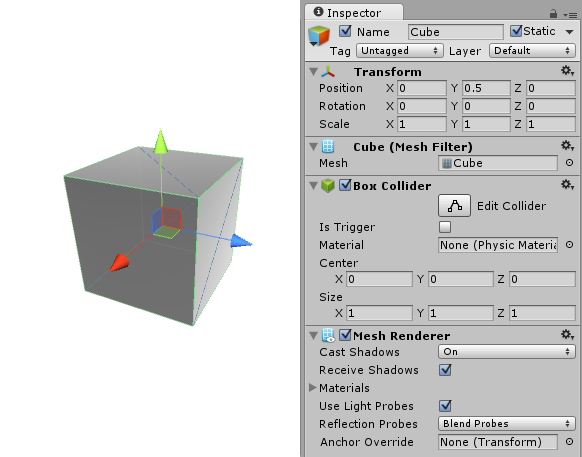
Adding a Component: To add a Component to a GameObject, select the GameObject you want to edit in the Hierarchy and select the desired Component from the "Component" menu in the menu bar, or click the "Add Component" button in the Inspector to open up the Component Browser and select the desired Component.
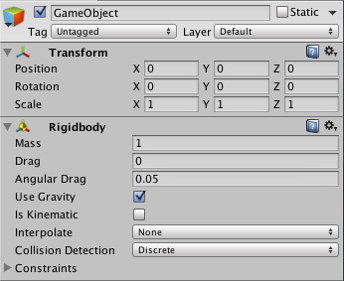
"We’ll try this now by adding a Rigidbody to the Cube we just created. Select it and choose Component->Physics->Rigidbody from the menu. When you do, you will see the Rigidbody’s properties appear in the Inspector. If you press Play while the empty GameObject is still selected, you might get a little surprise. Try it and notice how the Rigidbody has added functionality to the otherwise empty GameObject. (The Y position of the GameObject’s transform starts to decrease. This is because the physics engine in Unity is causing the GameObject to fall under gravity.)"
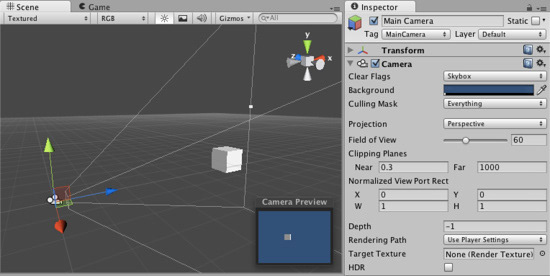
Camera: "A Unity scene is created by arranging and moving objects in a three-dimensional space. Since the viewer’s screen is two-dimensional, there needs to be a way to capture a view and “flatten” it for display. This is accomplished using Cameras.
A camera is an object that defines a view in scene space. The object’s position defines the viewpoint, while the forward (Z) and upward (Y) axes of the object define the view direction and the top of the screen, respectively. The Camera component also defines the size and shape of the region that falls within the view. With these parameters set up, the camera can display what it currently “sees” to the screen. As the camera object moves and rotates, the displayed view will also move and rotate accordingly."
Parenting: "Parenting is one of the most important concepts to understand when using Unity. When a GameObject is a Parent of another GameObject, the Child GameObject will move, rotate, and scale exactly as its Parent does. You can think of parenting as being like the relationship between your arms and your body; whenever your body moves, your arms also move along with it. Child objects can also have children of their own and so on. So your hands could be regarded as “children” of your arms and then each hand has several fingers, etc. Any object can have multiple children, but only one parent. These multiple levels of parent-child relationships form a Transform hierarchy. The object at the very top of a hierarchy (ie, the only object in the hierarchy that doesn’t have a parent) is known as the root.
You can create a Parent by dragging any GameObject in the Hierarchy View onto another. This will create a Parent-Child relationship between the two GameObjects.
Note that the Transform values in the Inspector for any child GameObject are displayed relative to the Parent’s Transform values. These values are referred to as local coordinates. Returning to the analogy of body and arms, the position of your body may move as you walk but your arms will still be attached at the same relative position. For scene construction, it is usually sufficient to work with local coordinates for child objects but in gameplay it is often useful to find their exact position in world space or global coordinates. The scripting API for the Transform component has separate properties for local and global position, rotation and scale and also allows you to convert any point between local and global coordinates."
Selecting GameObjects: "To select a GameObject, click on it in the Scene view or click its name in the Hierarchy window. To select or de-select multiple GameObjects, hold the Shift key while clicking, or drag a rectangle around multiple GameObjects to select them.
Unity highlights selected GameObjects and their children in the Scene view. By default, the selection outline color is orange, and the child outline color is blue. You can also choose to highlight selected GameObjects’ wireframes in a different color. You can change all of these outline highlight colors from the Unity Preferences (Unity > Preferences on macOS or Edit > Preferences on Windows)."
Gizmos: "Gizmos are graphics associated with GameObjects in the Scene. Some Gizmos are only drawn when the GameObject is selected, while other Gizmos are drawn by the Editor regardless of which GameObjects are selected. They are usually wireframes, drawn with code rather than bitmap graphics, and can be interactive. The Camera Gizmo and Light direction Gizmo (shown below) are both examples of built-in Gizmos; you can also create your own Gizmos using script. See documentation on Understanding Frustum for more information about the Camera.
Some Gizmos are passive graphical overlays, shown for reference (such as the Light direction Gizmo, which shows the direction of the light). Other Gizmos are interactive, such as the AudioSource spherical range Gizmo, which you can click and drag to adjust the maximum range of the AudioSource.
The Move, Scale, Rotate and Transform tools are also interactive Gizmos. See documentation on Positioning GameObjects [below] to learn more about these tools."

The Camera Gizmo and a Light Gizmo. These Gizmos are only visible when they are selected.
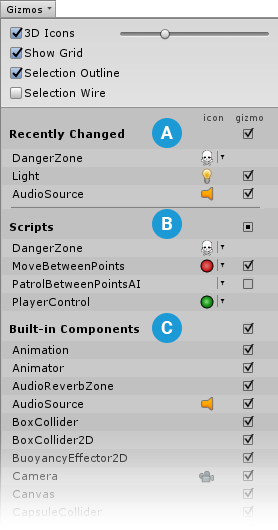
Gizmos Menu: Use the list in the Gizmos menu to control the visibility of icons and gizmos for various components.
Positioning GameObjects: "The first tool in the toolbar, the Hand Tool, is for panning around the Scene. The Move, Rotate, Scale, Rect Transform and Transform tools allow you to edit individual GameObjects. To alter the Transform component of the GameObject, use the mouse to manipulate any Gizmo axis, or type values directly into the number fields of the Transform component in the Inspector.
Alternatively, you can select each of the four Transform modes with a hotkey: W for Move, E for Rotate, R for Scale, T for RectTransform, and Y for Transform.

The Move, Rotate, Scale, Rect Transform and Transform Gizmos

Access the positioning tools via buttons in the Toolbar.
Move Tool: "At the center of the Move Gizmo, there are three small squares you can use to drag the GameObject within a single plane (meaning you can move two axes at once while the third keeps still).
If you hold shift while clicking and dragging in the center of the Move Gizmo, the center of the Gizmo changes to a flat square. The flat square indicates that you can move the GameObject around on a plane relative to the direction the Scene view Camera is facing.
When you click and drag on one of the three gizmo axes, you will notice that its color changes to yellow. As you drag the mouse, you will see the object translate along the selected axis. When you release the mouse button, the axis remains selected."
Rotate Tool: "With the Rotate tool selected, change the GameObject’s rotation by clicking and dragging the axes of the wireframe sphere Gizmo that appears around it. As with the Move Gizmo, the last axis you changed will be colored yellow. Think of the red, green and blue circles as performing rotation around the red, green and blue axes that appear in the Move mode (red is the x-axis, green in the y-axis, and blue is the z-axis). Finally, use the outermost circle to rotate the GameObject around the Scene view z-axis. Think of this as rotating in screen space."
Scale Tool: "The Scale tool lets you rescale the GameObject evenly on all axes at once by clicking and dragging on the cube at the center of the Gizmo. You can also scale the axes individually, but you should take care if you do this when there are child GameObjects, because the effect can look quite strange."
RectTransform Tool: "The RectTransform is commonly used for positioning 2D elements such as Sprites
or UI elements, but it can also be useful for manipulating 3D GameObjects. It combines moving, scaling and rotation into a single Gizmo:
or UI elements, but it can also be useful for manipulating 3D GameObjects. It combines moving, scaling and rotation into a single Gizmo:
Click and drag within the rectangular Gizmo to move the GameObject.
Click and drag any corner or edge of the rectangular Gizmo to scale the GameObject.
Drag an edge to scale the GameObject along one axis.
Drag a corner to scale the GameObject on two axes.
To rotate the GameObject, position your cursor just beyond a corner of the rectangle. The cursor changes to display a rotation icon. Click and drag from this area to rotate the GameObject.
Transform Tool: "The Transform tool combines the Move, Rotate and Scale tools. Its Gizmo provides handles for movement and rotation. When the Tool Handle Rotation is set to Local (see below), the Transform tool also provides handles for scaling the selected GameObject."
Physics: "To have convincing physical behavior, an object in a game must accelerate correctly and be affected by collisions, gravity and other forces. Unity’s built-in physics engines provide components that handle the physical simulation for you. With just a few parameter settings, you can create objects that behave passively in a realistic way (ie, they will be moved by collisions and falls but will not start moving by themselves). By controlling the physics from scripts, you can give an object the dynamics of a vehicle, a machine, or even a piece of fabric."
Rigidbody Component: "A Rigidbody is the main component that enables physical behavior for a GameObject. With a Rigidbody attached, the object will immediately respond to gravity. If one or more Collider components are also added, the GameObject is moved by incoming collisions.
Since a Rigidbody component takes over the movement of the GameObject it is attached to, you shouldn’t try to move it from a script by changing the Transform properties such as position and rotation. Instead, you should apply forces to push the GameObject and let the physics engine calculate the results."
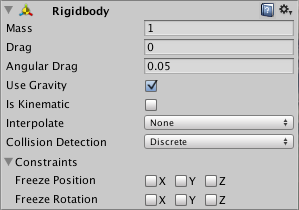
Example Rigidbody Component.
Collider Component: "Collider components define the shape of a GameObject for the purposes of physical collisions. A collider, which is invisible, does not need to be the exact same shape as the GameObject’s mesh. A rough approximation of the mesh is often more efficient and indistinguishable in gameplay.
The simplest (and least processor-intensive) colliders are primitive collider types. In 3D, these are the Box Collider, Sphere Collider and Capsule Collider. You can add any number of these to a single GameObject to create compound colliders."
Triggers: "The scripting system can detect when collisions occur and initiate actions using the OnCollisionEnter function. However, you can also use the physics engine simply to detect when one collider enters the space of another without creating a collision. A collider configured as a Trigger (using the Is Trigger property) does not behave as a solid object and will simply allow other colliders to pass through. When a collider enters its space, a trigger will call the OnTriggerEnter function on the trigger object’s scripts." [Note: This allows you to "trigger" pre-determined events in your scene, like a light turning on when a player enters a new room.]
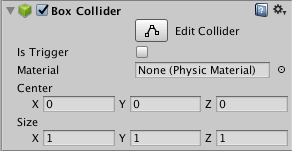
Example Collider Component.

Basic types of Colliders.
Material: "Materials define how a surface should be rendered, by including references to the Textures it uses, tiling information, Color tints and more. The available options for a Material depend on which Shader the Material is using."
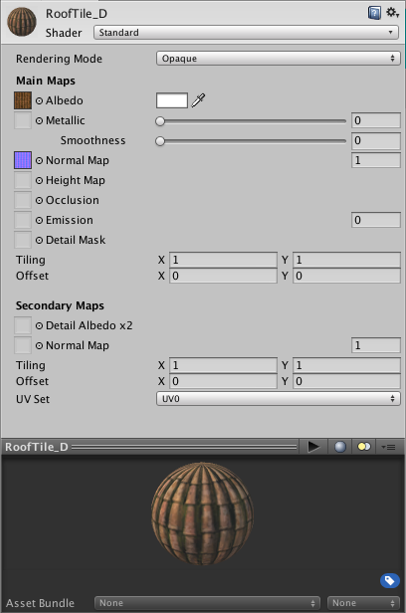
Example Material of a GameObject.
Texture: "Normally, the mesh geometry of an object only gives a rough approximation of the shape while most of the fine detail is supplied by Textures. A texture is just a standard bitmap image that is applied over the mesh surface. You can think of a texture image as though it were printed on a rubber sheet that is stretched and pinned onto the mesh at appropriate positions. The positioning of the texture is done with the 3D modeling software that is used to create the mesh.
Textures are applied to objects using Materials."
Shader: "The properties that a Material’s inspector displays are determined by the Shader that the Material uses. A Shader is a specialized kind of graphical program that determines how texture and lighting information is combined to generate the pixels of the rendered GameObject onscreen. Shaders can implement lighting and colouring effects to simulate shiny or bumpy surfaces among many other things."
"For most normal rendering (such as rendering characters, scenery, environments, solid and transparent GameObjects, hard and soft surfaces) the Standard Shader is usually the best choice. This is a highly customisable shader which is capable of rendering many types of surface in a highly realistic way.
There are other situations where a different built-in Shader, or even a custom written shader might be appropriate (for example liquids, foliage, refractive glass, particle effects, cartoony, illustrative or other artistic effects, or other special effects like night vision, heat vision or x-ray vision)."
Scripting: "Scripting is an essential ingredient in all games. Even the simplest game needs scripts, to respond to input from the player and arrange for events in the gameplay to happen when they should. Beyond that, scripts can be used to create graphical effects, control the physical behavior of objects or even implement a custom AI system for characters in the game. Scripting is a skill that takes some time and effort to learn."
Script Components: "The behavior of GameObjects is controlled by the Components that are attached to them. Although Unity’s built-in Components can be very versatile, you will soon find you need to go beyond what they can provide to implement your own gameplay features. Unity allows you to create your own Components using scripts. These allow you to trigger game events, modify Component properties over time and respond to user input in any way you like.
Unity's main programming language: C# (pronounced C-sharp), an industry-standard language similar to Java or C++.
Unlike most other assets, scripts are usually created within Unity directly. You can create a new script from the Create menu at the top left of the Project panel or by selecting Assets > Create > C# Script (or JavaScript) from the main menu.
The new script will be created in whichever folder you have selected in the Project panel. The new script file’s name will be selected, prompting you to enter a new name."

Example of Script Component.
Scripts are saved as Assets, found in the Project window.
Prefabs: "Unity’s Prefab system allows you to create, configure, and store a GameObject
complete with all its components, property values, and child GameObjects as a reusable Asset. The Prefab Asset acts as a template from which you can create new Prefab instances in the Scene.
complete with all its components, property values, and child GameObjects as a reusable Asset. The Prefab Asset acts as a template from which you can create new Prefab instances in the Scene.
When you want to reuse a GameObject configured in a particular way – like a non-player character (NPC), prop or piece of scenery – in multiple places in your Scene, or across multiple Scenes in your Project, you should convert it to a Prefab. This is better than simply copying and pasting the GameObject, because the Prefab system allows you to automatically keep all the copies in sync.
Any edits that you make to a Prefab Asset are automatically reflected in the instances of that Prefab, allowing you to easily make broad changes across your whole Project without having to repeatedly make the same edit to every copy of the Asset.
You can nest Prefabs inside other Prefabs to create complex hierarchies of objects that are easy to edit at multiple levels.
However, this does not mean all Prefab instances have to be identical. You can override settings on individual prefab instances if you want some instances of a Prefab to differ from others. You can also create variants of Prefabs which allow you to group a set of overrides together into a meaningful variation of a Prefab."

Example Prefabs.