The main elements making up your Scene's environment are a Floor/Terrain, GameObjects placed on top of the Floor/Terrain (such as trees, buildings, characters), the Skybox, Lighting, and Audio.
Floor/Terrain: The ground of the environment, or the GameObject that holds the Player and any other GameObjects up that have RigidBody components (and are thus susceptible to "gravity" effects via Unity's realtime physics simulation).
Skybox: "A wrapper around your entire scene that shows what the world looks like beyond your geometry. [It consists of] a 6-sided cube that is drawn behind all graphics in the game."
Lighting: "Lights are an essential part of every scene. While meshes and textures define the shape and look of a scene, lights define the color and mood of your 3D environment. You’ll likely work with more than one light in each scene." [A new Scene comes with a Directional Light GameObject by default.]
Audio: "A game would be incomplete without some kind of audio, be it background music or sound effects. Unity’s audio system is flexible and powerful. It can import most standard audio file formats and has sophisticated features for playing sounds in 3D space, optionally with effects like echo and filtering applied. Unity can also record audio from any available microphone on a user’s machine for use during gameplay or for storage and transmission."
Each of these items will be explained in depth below. First, it's important to decide which render pipeline to set up for your project.
Render Pipelines (* Note: The Universal Render Pipeline is recommended for most applications): "In Unity, you can choose between different render pipelines. A render pipeline performs a series of operations that take the contents of a Scene, and displays them on a screen. At a high level, these operations are:
1. Culling 2. Rendering 3. Post-processing
Different render pipelines have different capabilities and performance characteristics, and are suitable for different games, applications, and platforms.
It can be difficult to switch a Project from one render pipeline to another, because different render pipelines use different shader outputs, and might not have the same features. It is therefore important to understand the different render pipelines that Unity provides, so that you can make the right decision for your project early in development.
Unity offers the following render pipelines:
The Built-in Render Pipeline is Unity’s default render pipeline. It is a general-purpose render pipeline that has limited options for customization.
The Universal Render Pipeline (URP) is a Scriptable Render Pipeline that is quick and easy to customize, and lets you create optimized graphics across a wide range of platforms.
The High Definition Render Pipeline (HDRP) is a Scriptable Render Pipeline that lets you create cutting-edge, high-fidelity graphics on high-end platforms.
You can create your own custom Scriptable Render Pipeline (SRP) using Unity’s Scriptable Render Pipeline API. You can do this from scratch, or you can modify URP or HDRP to suit your needs.
Setting up the Universal Render Pipeline (URP):
Install URP:
1. In Unity, open your Project.
2. In the top navigation bar, select Window > Package Manager to open the Package Manager window.
3. Select the All tab. This tab displays the list of available packages for the version of Unity that you are currently running.
4. Select Universal RP from the list of packages.
5. In the bottom right corner of the Package Manager window, select Install. Unity installs URP directly into your Project.
Create URP Asset:
1. In the Editor, go to the Project window.
2. Right-click in the Project window, and select Create > Rendering: Universal Render Pipeline: Pipeline Asset. Alternatively, navigate to the menu bar at the top, and select Assets: Create: Rendering: Universal Render Pipeline: Pipeline Asset.
Add the Asset to your Graphics settings:
1. Navigate to Edit > Project Settings... > Graphics.
2. In the Scriptable Render Pipeline Settings field, add the Universal Render Pipeline Asset you created earlier. When you add the Universal Render Pipeline Asset, the available Graphics settings immediately change. Your Project is now using URP.
Upgrade your shaders:
If your Project uses Lit Shaders from the Built-in Render Pipeline, you must convert those Shaders to URP Shaders.
1. Open your Project in Unity, and go to Edit > Render Pipeline > Universal Render Pipeline.
2. According to your needs, select either Upgrade Project Materials to URP Materials or Upgrade Selected Materials to URP Materials.
Upgrading your Shaders: https://docs.unity3d.com/Packages/com.unity.render-pipelines.universal@7.2/manual/upgrading-your-shaders.html
Installing URP: https://docs.unity3d.com/Packages/com.unity.render-pipelines.universal@7.2/manual/InstallURPIntoAProject.html
Installing HDRP: https://docs.unity3d.com/Packages/com.unity.render-pipelines.high-definition@6.5/manual/Upgrading-To-HDRP.html
Video Tutorial on URP (skip to 02:40): https://www.youtube.com/watch?v=m6YqTrwjpP0&list=PLnM9YN1gFGUhrZZdidoWfjdl4PRcLhbpo&index=6&t=0s
Basic Floor: The easiest way to set up a flat floor in Unity is by creating a Plane primitive object.
"This is a flat square with edges ten units long [can be scaled larger or smaller] oriented in the XZ plane of the local coordinate space. It is textured so that the whole image appears exactly once within the square. A plane is useful for most kinds of flat surface, such as floors and walls. A surface is also needed sometimes for showing images or movies in GUI and special effects. Although a plane can be used for things like this, the simpler quad primitive is often a more natural fit to the task."

Primitive Plane.
Terrain: "Unity’s Terrain system allows you to add vast and varied landscapes to your game. At runtime, Terrain rendering is highly optimized for efficiency. The Unity Editor provides a selection of tools to create Terrain quickly and easily.
To add a Terrain GameObject to your Scene, select GameObject > 3D Object > Terrain from the menu. This also adds a corresponding Terrain Asset to the Project view. When you do this, the landscape is initially a large, flat plane. The Terrain’s Inspector window provides a number of tools to create detailed landscape features.
The toolbar provides five options to adjust your Terrain:
1. Create adjacent Terrain tiles.
2. Sculpt and paint your Terrain.
3. Add trees.
4. Add details such as grass, flowers, and rocks.
5. Change general settings for the selected Terrain.
Select the paintbrush icon to access painting tools, which allow you to modify the Terrain. Use the cursor to sculpt the height of the Terrain, or paint texture onto the Terrain. Choose from several built-in Brush shapes, or define your own Brush using a texture. You can also change the size and opacity (the strength of the applied effect) of the Brush. Once you’ve defined the properties, your cursor takes the shape of the selected Brush. Click or drag on the Terrain to create different shapes and textures.
Similar to how you paint with a Brush on the Terrain, you can add textures, trees, and details like grass, flowers, and rocks. You can also create additional connected Terrain tiles, change the height of an entire tile, and even write custom Brushes with complex effects."
Video Tutorials on Creating Terrains: https://www.youtube.com/watch?v=MWQv2Bagwgk&list=PLnM9YN1gFGUjcuB_9vGeYrM_TnDuLGcm5&index=3&t=0s

Terrain tools.

Example Terrain.
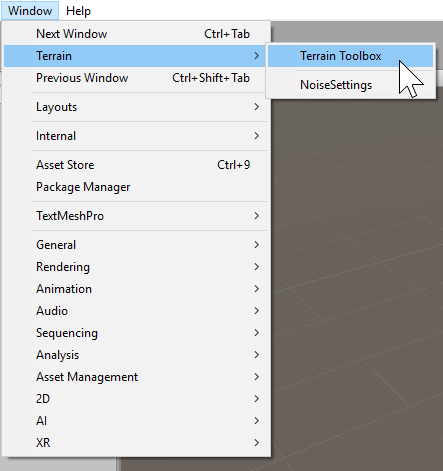
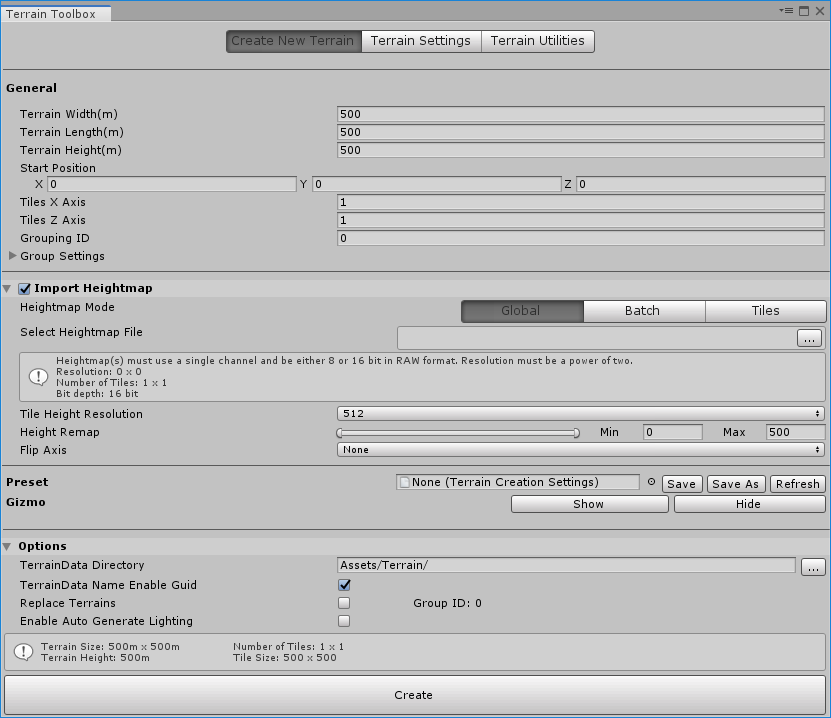
Terrain Toolbox: "The Terrain Toolbox is a tool that can be opened in the Editor, which contains useful tools to help ease Terrain workflows. It allows you to create new Terrain from preset settings or imported heightmaps, batch change Terrain settings on multiple Terrain tiles, and import/export splatmaps and heightmaps using the tools from the Toolbox.
To launch the Terrain Toolbox, select Window > Terrain > Terrain Toolbox.
The Toolbox window is a dockable window in the Editor, just like the Inspector. It comes with three tool wizards: Create New Terrain, Terrain Settings and Terrain Utilities."
Open the Terrain Toolbox window.
Terrain Toolbox window.
Terrain Heightmaps: "Textures can even be used in cases where the image will never be viewed at all, at least not directly. In a greyscale image, each pixelvalue is simply a number corresponding to the shade of grey at that point in the image (this could be a value in the range 0..1 where zero is black and one is white, say). Although an image like this can be viewed, there is no reason why the numeric pixel values can’t be used for other purposes as well, and this is precisely what is done with Terrain Heightmaps.
A terrain is a mesh representing an area of ground where each point on the ground has a particular height from a baseline. The heightmap for a terrain stores the numeric height samples at regular intervals as greyscale values in an image where each pixel corresponds to a grid coordinate on the ground. The values are not shown in the scene as an image but are converted to coordinates that are used to generate the terrain mesh.
Interestingly, even though a heightmap is not viewed directly as an image, there are still common image processing techniques that are useful when applied to the height data. For example, adding noise to a heightmap will create the impression of rocky terrain while blurring will smooth it out to produce a softer, rolling landscape."

Example Heightmap.
Generate a terrain from a real-world heightmap: The website "https://terrain.party" allows you to get heightmaps from anywhere around the world. Simply drag the resizable blue grid over the world map location you want to get the heightmap data for and click the download button. The website will ask you to name the location and then allow you to download a .zip folder with a few heightmap versions based on different data sets. I recommend using the "Merged" version.
In order for Unity to generate a terrain from the heightmap, it has to be in "Raw" format. It is really easy to convert the .png file to .raw in Photoshop:
1. Open the heightmap file.
2. Make sure the image resolution is a power of 2 (go to Image -> Image Size, set the width and height unit to "Pixels," and change the resolution to a power of 2 if it is not currently set to one).
3. Click Save As and select "Photoshop Raw" from the Format dropdown menu
4. In the "Photoshop Raw Options" pop-up menu, check the "Byte Order" settings: choose "Macintosh" if you are working in Unity on a Mac, and "IBM PC" if you are working in Unity on a PC.
In Unity:
1. Open the Terrain Toolbox window (explained in the Terrain Toolbox section above).
2. Under the "Import Heightmap" section, click the "..." button to "Select Heightmap File."
3. Open the .raw file you just created. [* Note: If your .raw file's resolution is not a power of 2, an error message will pop up.]
4. Consider setting the min and max heights for the to-be-generated terrain via the "Height Remap" setting.
5. Click the "Create" button at the bottom of the window. Unity will create a new TerrainGroup GameObject that contains your heightmap-generated terrain as a child object.

Use the terrain.party website to get real-world heightmaps.
Other resources for generating terrain in Unity: https://www.world-creator.com/
Skybox: "Skyboxes are rendered around the whole scene in order to give the impression of complex scenery at the horizon. Internally skyboxes are rendered after all opaque objects; and the mesh
used to render them is either a box with six textures, or a tessellated sphere.
used to render them is either a box with six textures, or a tessellated sphere.
To implement a Skybox create a skybox material. Then add it to the scene by using the Window > Rendering
> Lighting Settings menu item and specifying your skybox material as the Skybox on the Scene tab."
> Lighting Settings menu item and specifying your skybox material as the Skybox on the Scene tab."
Example Skybox material.
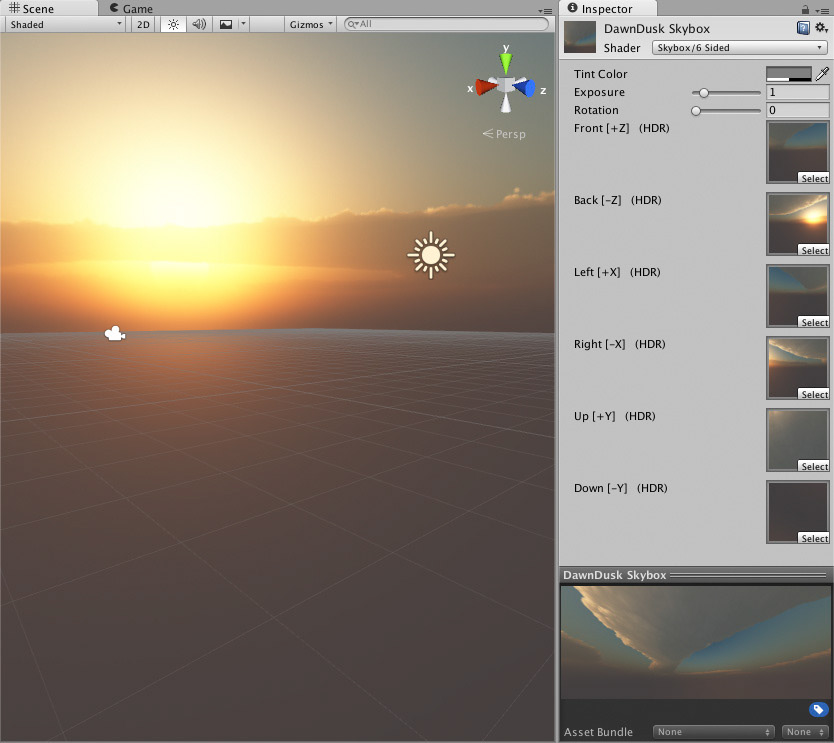
Create a Skybox Material: "A Skybox is a six-sided cube that Unity draws behind all graphics in the Scene. Here are the steps to create one:
1. Make six Textures that correspond to each of the six sides of the skybox, and put them into your Project’s Assets folder.
2. For each Texture, you need to change the wrap mode from Repeat to Clamp. If you don’t do this, colors on the edges do not match up.
3. Create a new Material. To do this, choose Assets > Create > Material from the menu bar."
* Note: You can find a bunch of free skyboxes in the Asset Store by searching "skybox" and sorting by "Price (Low to High)": https://assetstore.unity.com/packages/essentials/beta-projects/unity-hdri-pack-72511?q=skybox&orderBy=4
* Note: If you are using the HDRP, consult these resources to adjust the skybox of your scene: https://docs.unity3d.com/Packages/com.unity.render-pipelines.high-definition@4.9/manual/Visual-Environment.html
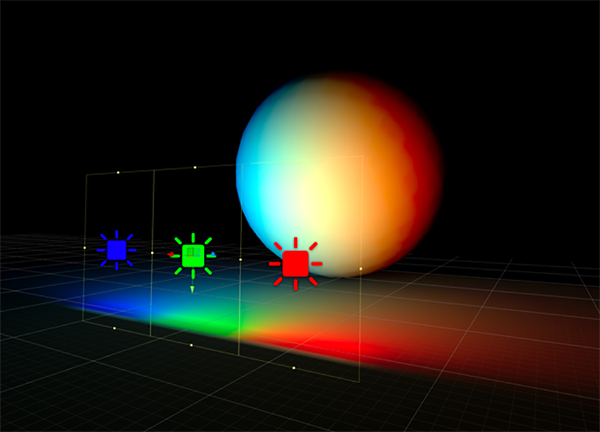
Lights: "Lights can be added to your scene from the GameObject->Light menu. You will choose the light format that you want from the sub-menu that appears. Once a light has been added, you can manipulate it like any other GameObject. Additionally, you can add a Light Component to any selected GameObject by using Component->Rendering->Light.
There are many different options within the Light Component in the Inspector."
Types of Light:
1. Directional Lights: "Directional lights are very useful for creating effects such as sunlight in your scenes. Behaving in many ways like the sun, directional lights can be thought of as distant light sources which exist infinitely far away. A directional light does not have any identifiable source position and so the light object can be placed anywhere in the scene. All objects in the scene are illuminated as if the light is always from the same direction. The distance of the light from the target object is not defined and so the light does not diminish."

Directional Light diagram.
Directional Light in a scene.
2. Point Lights: "A point light is located at a point in space and sends light out in all directions equally. The direction of light hitting a surface is the line from the point of contact back to the center of the light object. The intensity diminishes with distance from the light, reaching zero at a specified range. Light intensity is inversely proportional to the square of the distance from the source. This is known as ‘inverse square law’ and is similar to how light behaves in the real world.Point lights are useful for simulating lamps and other local sources of light in a scene. You can also use them to make a spark or explosion illuminate its surroundings in a convincing way."
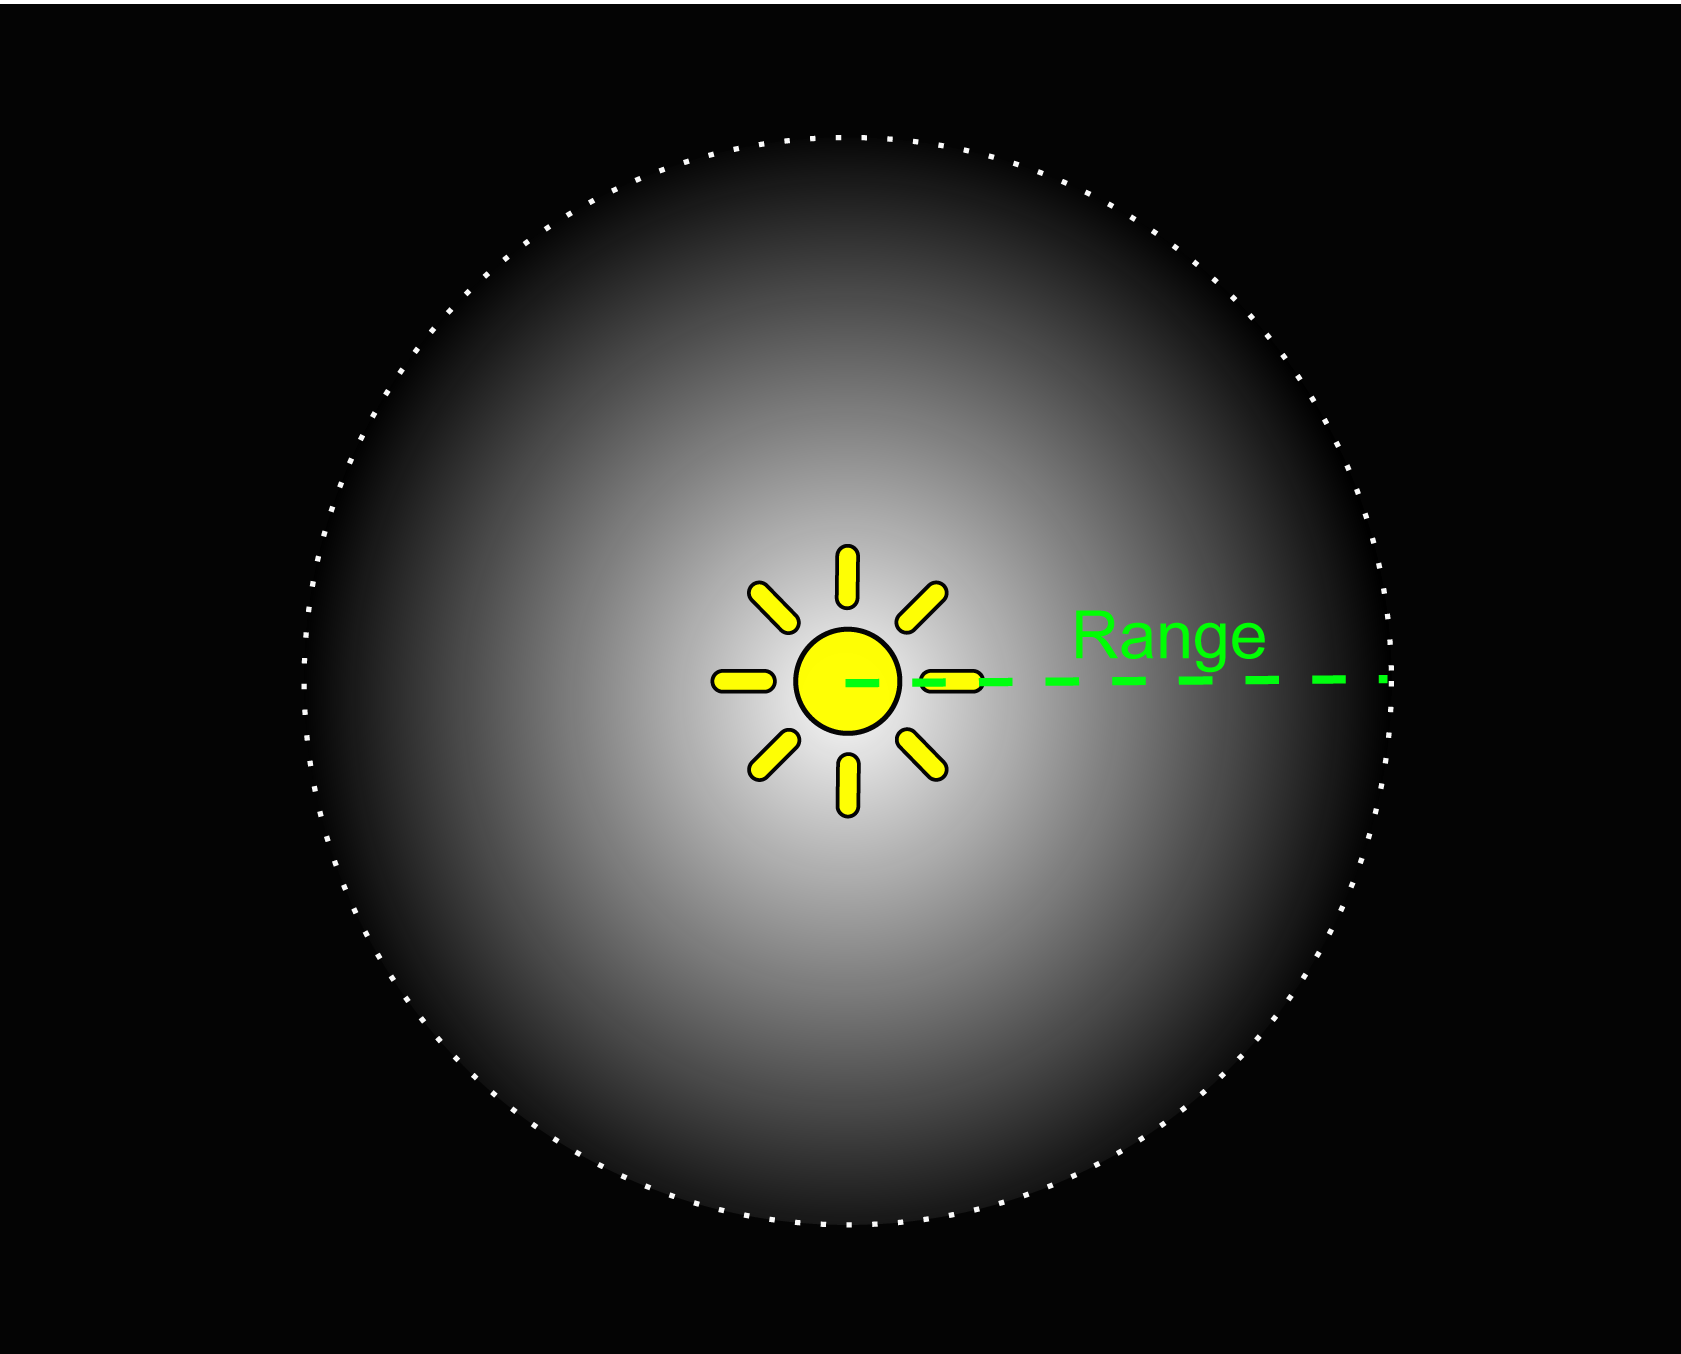
Point Light diagram.

Point Light in a scene.
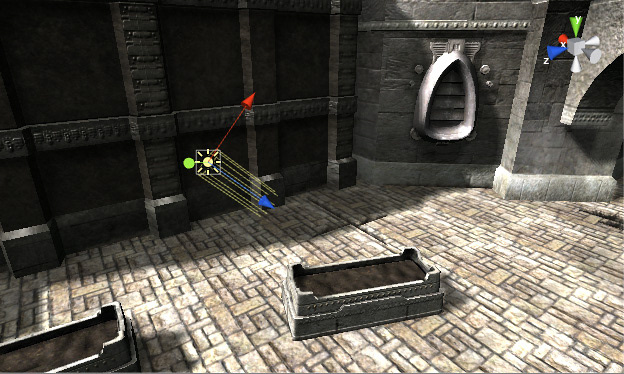
3. Spot Lights: "Like a point light, a spot light has a specified location and range over which the light falls off. However, the spot light is constrained to an angle, resulting in a cone-shaped region of illumination. The center of the cone points in the forward (Z) direction of the light object. Light also diminishes at the edges of the spot light’s cone. Widening the angle increases the width of the cone and with it increases the size of this fade, known as the ‘penumbra’.Spot lights are generally used for artificial light sources such as flashlights, car headlights and searchlights. With the direction controlled from a script or animation, a moving spot light will illuminate just a small area of the scene and create dramatic lighting effects."

Spot Light diagram.

Spot Light in a scene.
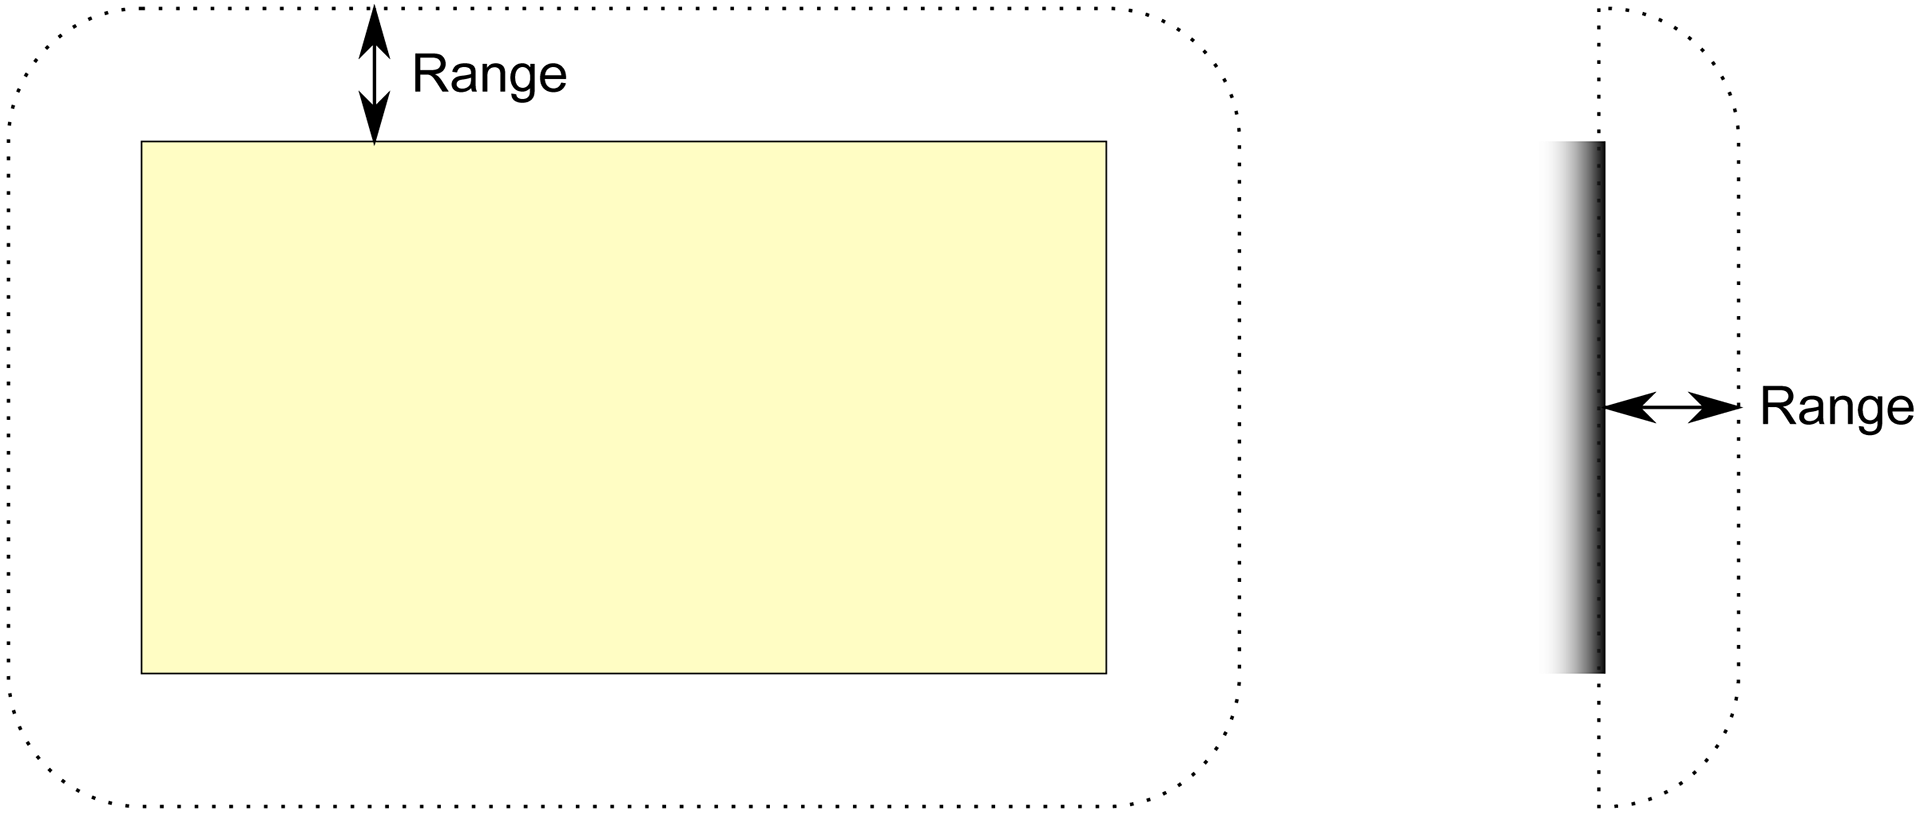
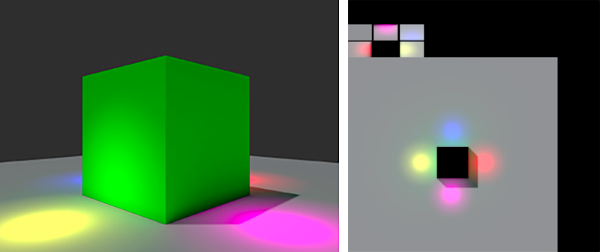
4. Area Lights: "An Area Light is defined by a rectangle in space. Light is emitted in all directions uniformly across their surface area, but only from one side of the rectangle. There is no manual control for the range of an Area Light, however intensity will diminish at inverse square of the distance as it travels away from the source. Since the lighting calculation is quite processor-intensive, area lights are not available at runtime and can only be baked into lightmaps.
Since an area light illuminates an object from several different directions at once, the shading tends to be more soft and subtle than the other light types. You might use it to create a realistic street light or a bank of lights close to the player. A small area light can simulate smaller sources of light (such as interior house lighting) but with a more realistic effect than a point light."
Area Light diagram.
Area Light in a scene.
5. Emissive Materials: "Like area lights, emissive materials emit light across their surface area. They contribute to bounced light in your scene and associated properties such as color and intensity can be changed during gameplay. Whilst area lights are not supported by Precomputed Realtime GI, similar soft lighting effects in realtime are still possible using emissive materials.
‘Emission’ is a property of the Standard Shader which allows static objects in our scene to emit light. By default the value of ‘Emission’ is set to zero. This means no light will be emitted by objects assigned materials using the Standard Shader.
Materials with an emission above zero will still appear to glow brightly on-screen even if they are not contributing to scene lighting. This effect can also be produced by selecting ‘None’ from the Standard Shader’s ‘Global Illumination’ Inspector property. Self-illuminating materials like these are a useful way to create effects such as neons or other visible light sources."
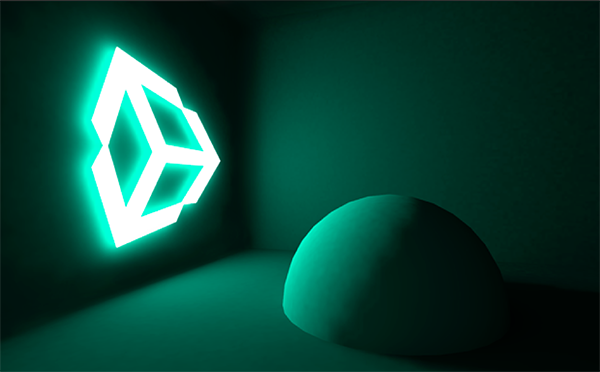
Emissive Material in a scene.
Other Lighting Tools for Indirect/Ambient Lighting [* Note: These are considerably more advanced features]: "Global Illumination (GI) is a system that models how light is bounced off of surfaces onto other surfaces (indirect light) rather than being limited to just the light that hits a surface directly from a light source (direct light). Modelling indirect lighting allows for effects that make the virtual world seem more realistic and connected, since objects affect each other’s appearance."
Example Tools: Ambient Occlusion / Light Probes / Reflection Probes
Lighting Techniques: "Broadly speaking, lighting in Unity can be considered as either ‘realtime’ or ‘precomputed’ in some way and both techniques can be used in combination to create immersive scene lighting."
1. Realtime Lighting: "By default, lights in Unity - directional, spot and point, are realtime. This means that they contribute direct light to the scene and update every frame. As lights and GameObjects are moved within the scene, lighting will be updated immediately. This can be observed in both the scene and game views.
Unfortunately, the light rays from Unity’s realtime lights do not bounce when they are used by themselves. In order to create more realistic scenes using techniques such as global illumination we need to enable Unity’s precomputed lighting solutions."
2. Baked Lighting: "Unity can calculate complex static lighting effects (using a technique called global illumination, or GI) and store them in a reference texture map called a lightmap. This calculation process is referred to as baking.
When baking a lightmap, the effects of light sources on static objects in the scene are calculated and the results are written to textures which are overlaid on top of scene geometry to create the effect of lighting.
With baked lighting, these lightmaps cannot change during gameplay and so are referred to as ‘static’. Realtime lights can be overlaid and used additively on top of a lightmapped scene but cannot interactively change the lightmaps themselves.With this approach, we trade the ability to move our lights at gameplay for a potential increase in performance, suiting less powerful hardware such as mobile platforms."
Example of a baked lightmap.
3. Precomputed Realtime Global Illumination: "With this approach it is possible to create lit environments featuring rich global illumination with bounced light which responds, in realtime, to lighting changes.
In order to deliver these effects at playable framerates, we need to shift some of the lengthy number-crunching from being a realtime process to one which is precomputed.
Precomputing shifts the burden of calculating complex light behaviour from something that happens during gameplay, to something which can be calculated when time is no longer so critical. We refer to this as an ‘offline’ process."
The Lighting Window: "The Lighting window contains 3 tabs:
1. The Scene tab contains lighting settings that apply to the overall Scene rather than individual GameObjects.
2. The Realtime Lightmaps tab shows a list of all realtime lightmaps for the current Scene. If Realtime Global Illumination is not enabled in your Project, this tab will be empty.
3. The Baked Lightmaps tab shows a list of baked lightmaps for the current Scene, along with the Lighting Data Asset. If Baked Global Illumination is not enabled in your Project, this tab will be empty.
At the bottom of the Lighting window is the Auto Generate checkbox. When enabled, Unity updates lightmap data as you edit the Scene. Note that the update usually takes a few seconds rather than happening instantaneously. If Auto Generate is disabled, the Generate Lighting button to the right of the checkbox becomes active; use this button to trigger lightmap updates when you need them."

The Lighting window.
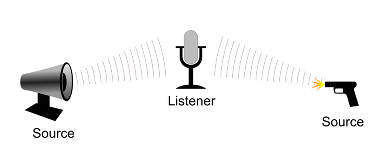
Sound Design: "To simulate the effects of position, Unity requires sounds to originate from Audio Sources attached to objects. The sounds emitted are then picked up by an Audio Listener attached to another object, most often the main camera. Unity can then simulate the effects of a source’s distance and position from the listener object and play them to the user accordingly. The relative speed of the source and listener objects can also be used to simulate the Doppler Effect for added realism.
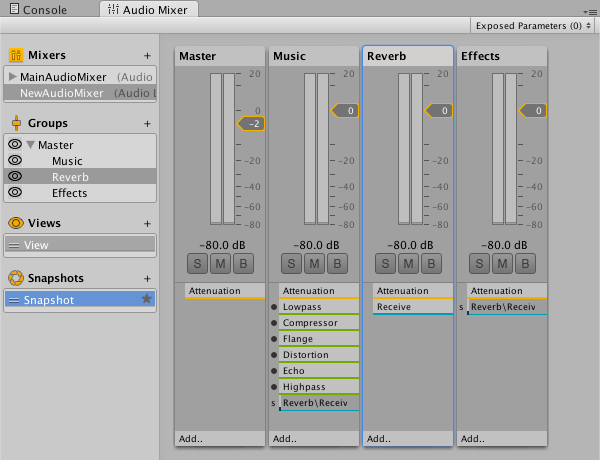
The Unity Audio Mixer allows you to mix various audio sources, apply effects to them, and perform mastering.
Unity can import audio files in AIFF, WAV, MP3 and Ogg formats in the same way as other assets, simply by dragging the files into the Project panel. Importing an audio file creates an Audio Clip which can then be dragged to an Audio Source or used from a script.
Unity can access the computer’s microphones from a script and create Audio Clips by direct recording."
https://docs.unity3d.com/560/Documentation/Manual/AudioOverview.html
https://docs.unity3d.com/560/Documentation/Manual/AudioOverview.html
Graphic depicting how Unity sets up sound.
Example Audio Mixer.
Audio Listener: "The Audio Listener acts as a microphone-like device. It receives input from any given Audio Source in the scene and plays sounds through the computer speakers. For most applications it makes the most sense to attach the listener to the Main Camera. If an audio listener is within the boundaries of a Reverb Zone reverberation is applied to all audible sounds in the scene. Furthermore, Audio Effects can be applied to the listener and it will be applied to all audible sounds in the scene."

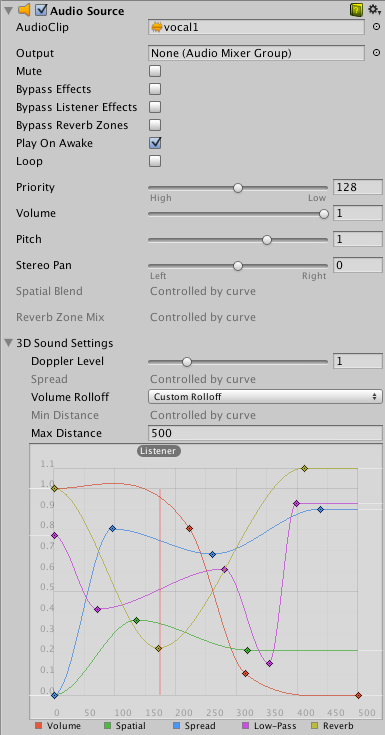
Audio Source: "The audio source can play any type of Audio Clip and can be configured to play these as 2D, 3D, or as a mixture (SpatialBlend). The audio can be spread out between speakers (stereo to 7.1) (Spread) and morphed between 3D and 2D (SpatialBlend). This can be controlled over distance with falloff curves. Also, if the listener is within one or multiple Reverb Zones, reverberation is applied to the source. Individual filters can be applied to each audio source for an even richer audio experience."